You can configure details of those File Systems in Pyramid that can be used as System Storage or to write publications to when performing a scheduled File Distribution. Setting up multiple File Systems allows your administrator to switch locations easily.
For each external File System, you can supply both General details (naming and so on) and Settings. Settings are configured per Permanent Storage Type (Internal, S3, and so on) and enable connections to be established.
Note: This feature is only available with the Enterprise Edition license.
Note: Using file storage as a destination for document publication output is only available with an External Bursting Premium license.
File System Tab
Click the File System tab (orange arrow) at the top of the Services > Storage Settings page:
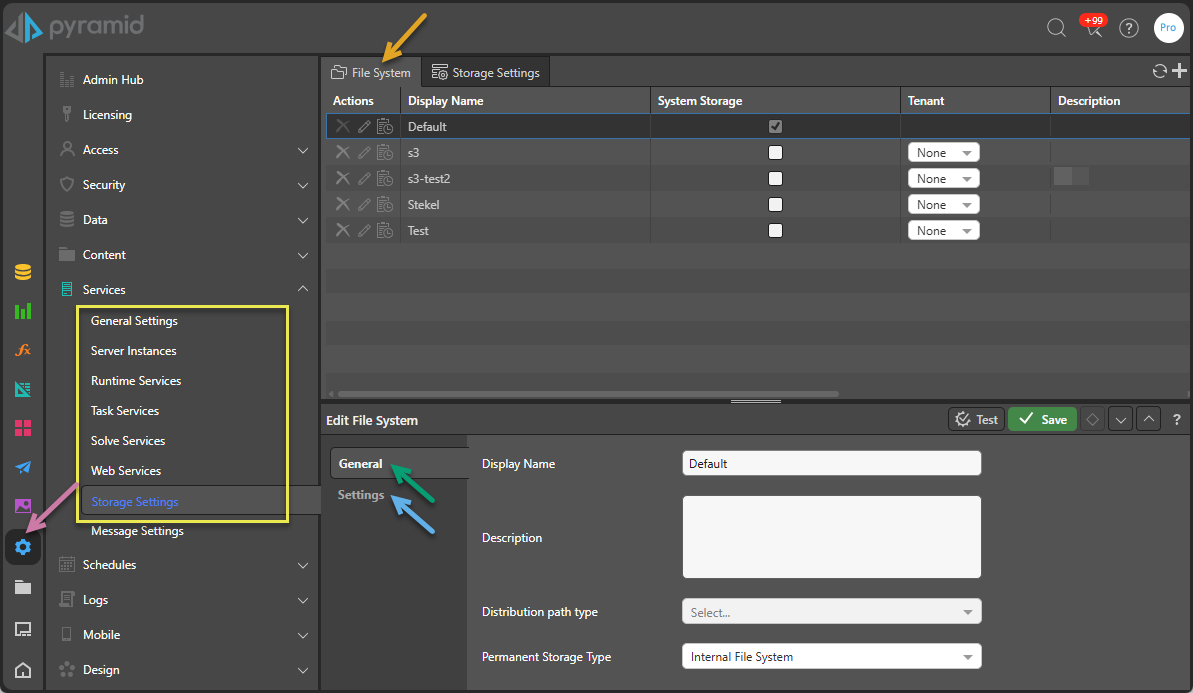
File Systems List
Creating, editing, and deleting File Systems:
- Add a File System: Click Plus (+) at the top-right of the File System list to capture details of a new file system. When you click the button, the Edit File System panel opens at the bottom of the page. You need to specify a Caption (name), select a Permanent Storage Type, and then complete the file system details. The fields shown in this panel depend on your Permanent Storage Type.
- Edit an Existing File System: Click Edit in the Actions column to open the Edit File System panel with the details of the selected file system in it. Edit the details as required.
- Delete an Existing File System: Click Delete in the Actions column to delete a file system. You cannot delete a file that is currently in use.
Important: You need read-write access to any external File System to enable this functionality.
System Storage
Select the System Storage checkbox to indicate that the selected File System is used as System Storage. This is the default file system, sometimes known as Primary System Storage or Permanent Storage location and is where content from Model and Publish is stored persistently. For more information, see System Storage.
Warning: Changing which File System is used as the System Storage is a high impact action, breaking all previously created references.
Tenant
To reserve the given File System for a specific tenant, choose that tenant from the Tenant dropdown list. Once selected, the File System can only be used by that tenant.
Note: You cannot select this option for the File System that is flagged as System Storage.
Edit File System
You must select an option in the list or click add to open this panel at the bottom of the page:
General tab
The fields on the General tab (green arrow) are common to all types and include:
- Display Name: This is the name of your server and will be used to select this file system elsewhere in Pyramid.
- Description: Optional text description.
- Distribution Path Type: See below.
- Permanent Storage Type: This is the File Storage type and can be one of: Internal File System, Azure Blob, Amazon S3, SSH/SFTP, or Shared Folder/Local Path. See Settings tab (below) for more information about each type including configuration.
Distribution Path Type
This is the folder structure that document publications will be distributed to when the File Distribution option is selected in Publish. It is not relevant to Internal File Systems.
- Selecting Publication Tree writes your distributed files to a structure that is sorted by the name of your publication:
- Selecting Recipient Tree writes your distributed files to a structure that is sorted by the name of the target "recipient," which is driven by the Slicer and Role Column selections:
<Tenant>/<Publication>/<Schedule>/DATETIME/<Custom Slicer>/<Recipient>
<Tenant>/<Recipient>/<Publication>/<Schedule>/DATETIME/<Custom Slicer>
Each of <Tenant>, <Publication>, and <Schedule> are replaced with the name and ID of the referenced item in the format name-ID. For example, the Tenant "default" with the ID "123456" becomes default-123456 in this path.
The <Custom Slicer> and <Recipient> values are customized values driven by your selection from the Distribution Slicer when a File Mapping is used and both Distribution Slicer and Role Column when a Data Model Mapping Source is used.
The File Distribution topic includes several examples of file path configurations, including a File Mapping configuration that builds the following on the Publication tree: s3://my-bucket/default-123456/Publication1-123456/Job1-123456/202508091500/Accessories/accesorios/es/Publication1-Accessories_2025-08-09.pdf For more information, see File Distribution in Publish Pro.
Settings tab
Which fields you need to complete on the Settings tab (blue arrow) depends on your selected Permanent Storage Type (above):
Internal File System
The Internal File System is the default system created by the installation process.
There are no Settings for the Internal File System.
Azure Blob
Where this is selected, all persistent files are stored on Azure Blob storage. The Settings for Azure Blob include:
- Storage Account Name: The name for your storage account with Microsoft Azure.
- Storage Account Key: The account key used to connect to the account.
- Container: Once you have entered your account name and key, click Refresh to populate the dropdown list and then select the container name.
- Folder: Once you have selected your container, click Refresh to populate the dropdown list and select the folder name or
/.
Amazon S3
Where this is selected, all persistent files are stored on AWS S3 Bucket storage. The Settings for Amazon S3 include:
- AWS Access Key ID: AWS Access Key ID. To use an AWS IAM role, type
"iam"into this field after configuring a role on AWS. In this case, you do not need to set an AWS Secret Access key. - AWS Secret Access key: AWS Secret Access key.
- Region ID: AWS Region Code. A full list can be found here.
- Bucket: Once the previous details are correct, click Refresh to populate the dropdown list and then select the bucket name.
- Folder: Once the previous details are correct, click Refresh to populate the dropdown list and select the folder name or
/.
FTP
Where this is selected, all persistent files are stored on an FTP file system. The Settings for FTP include:
- Hostname: FTP server address.
- Port: FTP server port.
- User Name: FTP server username.
- Password: FTP server password.
- Encryption: Select FTP encryption option.
- Mode: Select Active or Passive mode.
- Folder: Once the previous details are correct, click Refresh to populate the dropdown list and select the folder name or
/.
SSH/SFTP
Where this is selected, all persistent files are stored on an SSH/SFTP file system. The Settings for SSH/SFTP include:
- Hostname: SSH/SFTP server address.
- Port: SSH/SFTP server port.
- User Name: SSH/SFTP server username.
- Password: SSH/SFTP server password.
- Folder: Once the previous details are correct, click Refresh to populate the dropdown list and select the folder name or
/.
Shared Folder/Local Path
Where this is selected, all persistent files are stored on the specified shared folder or directory.
Use of a shared folder differs between Windows and Linux. In both scenarios, the shared folder needs to be IDENTICALLY deployed to each server in the cluster, pointing to a common shared resource.
Windows
- Folder: supply the UNC path to a shared folder
To create the shared folder in Windows, the UNC path needs to be the same on all servers. It can also be created with a net use command that adds a virtual drive to each Windows machine with the following command:
net use Z: \\server\folder /user:domain\myusername mypassword /persistent:yes
Linux
- Folder: supply the local path that is linked to a shared mounted drive
To create the shared folder in Linux, mount a folder from a server to a local folder on all servers in the cluster. This can be done with the following command:
sudo mount -t nfs servername:/sharedfolder /mnt/shared
Masked Fields
Many of the masked fields (keys and passwords) incorporate a Show/Hide icon, allowing you to view clear text versions of masked values:

Test Changes
To check the connection, click Test before committing your changes. This test writes, reads, and deletes a file on the file system.
Storage Settings Tab
Click the File System tab (orange arrow) at the top of the Storage Settings page to access this content:
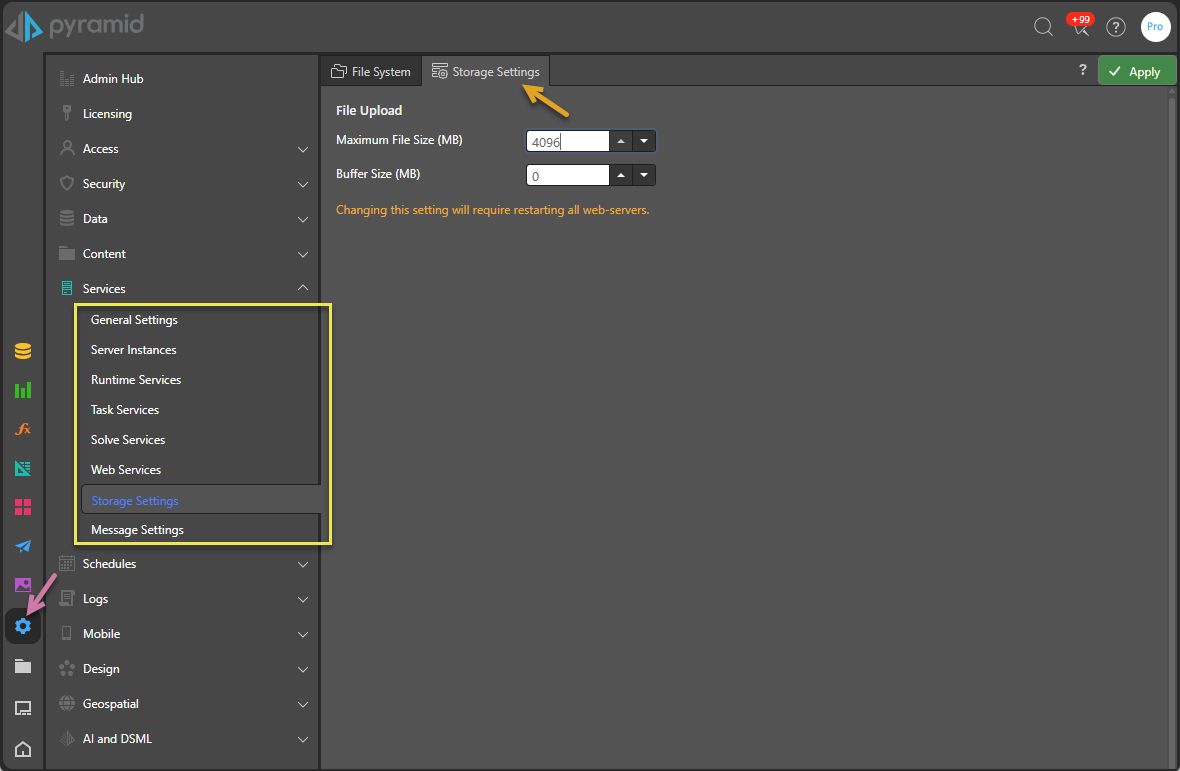
File Upload
These settings govern the size of files that can be uploaded to the application:
These options usually affect Model, since users upload large data files for processing. Buffering governs the size of the chunks that the uploader will accept each time a piece of the source file is uploaded.
Note: Setting the file size too high can overload the web servers and client browser. If large files need to be imported, it is typically better to use a network reference to those files instead.